
Aims: children will understand
1. The size, distances, orbits and composition of the Earth, Sun and Moon
2. Why we have days, years, seasons and lunar phases - how these are caused by the relative movements of the Earth, Sun and Moon
Main activities
1. Learn about the Sun and its relationship to Earth by making a working globe of the Earth
2. Learn about the Moon and its relationship to Earth by adding the Moon to this model
3. Look at models, photos and films, and do hands-on activities using models and lights to aid understanding of important concepts
4. OPTIONAL - children paint models of the Moon - cost = extra £26

Teachers' Reviews
'An amazing hands-on way to learn about the Earth, Sun and seasons'
- Y5 teacher, Cams Lane Primary, Radcliffe
'I cannot believe how much they learnt in a day. The activities were perfect and clearly explained the concepts that I often find very tricky to teach.'
- Y5 teacher, St. Benedict's Primary, Wigan
Introduction
This workshop is designed to cover the Earth and Space unit of the Science National Curriculum for year 5. The workshop uses model making and other activities such as using models and lights, as well as photos, films and scientific puzzles.
These highly engaging and educational activities will ensure the best possible learning of important scientific concepts.
The lesson is suitable for year 5 and 6. Detailed lesson plans are provided below.
To Book The Workshop:
Contact: Tony North
Email: tnorth67@hotmail.com
Tel: 0161 224 6445/07754 46422
Price: £329 per class for a whole day, £355 if painting Moon models. Max. 32 children.
Fact files about the Solar System - information on the Sun, planets and major moons.
Lesson Plans
1. Introduction to the Earth (30 minutes)
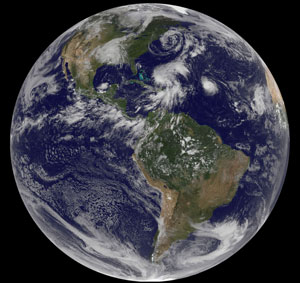
We begin by reviewing the Earth - What is it? How big is it? How does it move?
By looking at photos, and acting out motions and sunlight with a globe and a torch, we see how the Earth rotates once every 24 hours and orbits the sun every 365 days. We also learn that the axis is tilted, and that there are warm parts (around the equator) and cold parts (at the poles). We will learn why this is later.
2. Make a globe of the Earth (45 minutes)

Click for larger version
Each child now makes a working globe, using a plastic ball, wire, and a card base. They draw the continents on with permanent markers, make holes at the poles with darts, and thread and bend the wire so the model will spin on an axis. They sellotape the globe to a card base and use a protractor to bend the axis to 23 degrees.
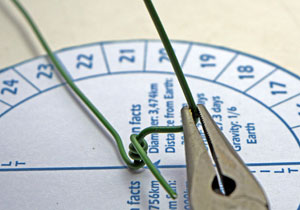
Bending the wire with pliers

Drawing on the equator and continents
3. Learn about the Sun, with games (30 minutes)
Next we consider the Sun: What is it? What is it made of and why does it give us light and heat?
To help children understand the size of the Sun (1.4 million km) and its distance from Earth (150 million km) we play games. Children work in small teams (up to 8 teams in all), each of which has a box with balls of various sizes (e.g. beads, marbles, golf balls).
Size of the Sun Game
In the first game I show children a large beach ball which stands for the Sun (about 46cm diameter). Teams estimate the relative size of Earth, and hold up the correct ball from their box.
In all games winning teams receive luminous stars as prizes.

Distance to the Sun Game
In the second game, a golf ball (4cm) stands for the Sun, and all the children estimate how far away the Earth would be at this scale, by getting up and holding a pencil at the correct location in the classroom (the tip of the pencil represents Earth).
We briefly discuss why the Sun is so important to us on Earth: it provides heat and light without which life would not be possible.
Some of the models used in the workshop - click for larger version
Lesson plan continues in the next column →
4. Learn about days and years using the model (30 minutes)
We next use the model children have made on a large diagram (an A1 laminated picture - see below). This mat is shared by the team on their tables, with a bright lantern in the centre to represent the Sun. By rotating their globes children see why we have day and night. Also, by moving their globes round the Sun a small amount each day, they see how a year comes about.

Click for larger version
5. Learn about seasons (30 minutes)
(if your lunch starts at 12.00 this section will begin after lunch)
We now discuss what seasons are, and teams brainstorm why we might have them. I demonstrate the answer first using some children, a torch and models.
Next children see the answer for themselves by placing their globes on the diagram at positions which stand for each season, with the globe always tilted in the same direction (shown by the arrows in the photo above).
In this way we see how in winter the northern hemisphere is tilted away from the sun, which means less sunlight reaches us (and also the sun has more atmosphere to pass through, which reduces its intensity). In summer we are tilted towards the sun, and so the opposite is true. We also see how the reverse is true for the southern hemisphere. There will be more questions and prizes.
To reinforce this idea, children also shine a torch at a card. By tilting the card backwards they see how the area covered by the light increases, so the light is more spread out, and weaker at any one point.
I will also show a film I made of the changing seasons in my back garden ( I took one photo per day for a whole year).
6. The Moon (30 minutes)
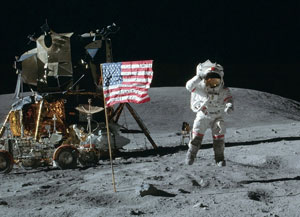
Astronaut John Young on the Moon in 1972
After lunch we look at the Moon. We use photos, lights and models to understand its features, such as craters and mares (the dark parts of the Moon), its composition, and its formation, as well as human exploration.
To understand the size of the Moon and its distance from Earth, teams play games using balls, as before with the Earth and Sun.
If time allows we will discuss the importance of the Moon: it causes tides, and its gravity stabilises the tilt of the Earth. Both of these may be essential to life on Earth.
7. The Phases of the Moon (20 minutes)

To understand the phases of the Moon we do a demonstration with some children. We shine a torch on a model and move it around a globe. Working in their teams, children then try this activity themselves.
We use a 1.5cm polystyrene ball to represent the Moon. Children draw on some of the features (the dark mares) and poke a hole through with a toothpick. Holding up the Moon each child turns around 360 degrees (in this activity their head represents Earth) while another child shines the torch on the Moon. They will then see the phases of the Moon over its 27-day orbit.
Lesson plan continues in next column →
8. Adding the Moon to our globe model (20-30 minutes)

Click for larger version
Children now place the Moon model onto their globes, so the Moon can orbit the Earth. The card is marked with the 27 days of the lunar cycle, so children can see how the Moon revolves round the Earth in 27 days with one Earth spin per day.
9. Learn how the Earth Sun and Moon System Works Together (20 minutes)
Children place their models on the large mat as before. They can now carry out the full movements of the Earth, Sun and Moon, with the lantern at the centre representing the Sun. They rotate the Earth once per day, moving it one step around the Sun, and moving the Moon one day at a time. They continue for a whole month to show a full orbit of the Moon with the corresponding 1/12 orbit of the Earth round the Sun.
This will consolidate their understanding of the workings of the Earth Sun and Moon system. They can also see the phases of the Moon changing as they do this.
10. Quiz
If any time remains we will finish with a quiz, and I will answer any questions the children have.
If time allows we can play an 'Earth or Mars?' game, in which teams see photos of the surface of Mars and similar desert areas on Earth, and have to decide which planet they show.

Earth or Mars? (answer here)
11. Optional Extra Activity - 30 minutes (replaces activities 9 and 10 above) - Paint a model of the Moon
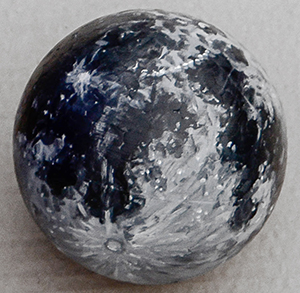
For an extra £25 each child will be provided with a polystyrene ball (size ranging from 7 to 10cm depending on what I have available) and will paint it to look like the Moon.
I will provide the balls and the paints as well as photos to copy.
If you wish you can have some children paint beach balls to look like the Earth - these will be at the right size compared to the Moon models to help children understand the relative sizes. The beach balls are much larger and painting the Earth is more difficult, so children will work in pairs, and I recommend only your most artistic children do this.

'An amazing hands-on way to learn about the Earth, Sun and seasons'
- Y5 Teacher, Cams Lane Primary, Radcliffe
'Hi Tony, just a quick email to say thank you so much for the recent Earth, Sun and Moon workshop you brought to life at St Benedict’s! From the minute you walked in to the minute you left, my class were in awe of your knowledge and activities. I can not believe how much they learnt in a day. The activities were perfect and clearly explained the concepts that I often find very tricky to teach. The practical tasks helped children to learn facts they’ll never forget. It was a bonus that every child got to take home their very own model! Since your workshop, my class created posters and information leaflets all about the Earth, Sun and Moon and have even been into other classes to teach them all about it. Goes without saying I will be in touch about doing the same next year.'
-Michelle Ainscough, Y5 Teacher, St. Benedicts Primary, Wigan